Well, It’s been one of those weeks and I have been M.I.A., but I finally have some Easter goodies to show you today.
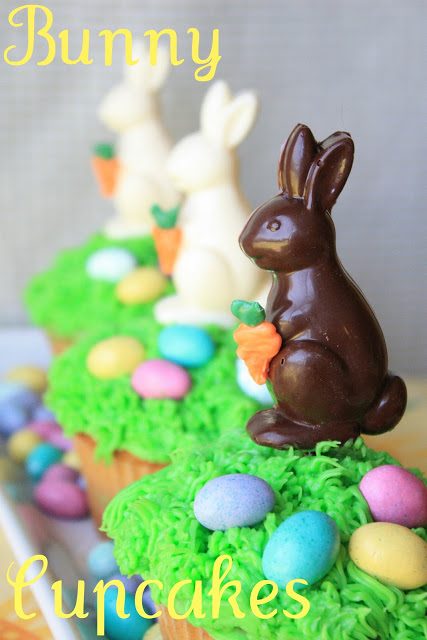
These bunny cupcakes were created using recipes from two blogs (and bloggers) that I thoroughly enjoy~Cheryl of Tidy Mom and Glory of Glorious Treats.
On a recent Tidy Mom post, Cheryl made lemon cupcakes and decorated them three different ways. They all looked amazing, but I zeroed in on the filling of homemade lemon curd.
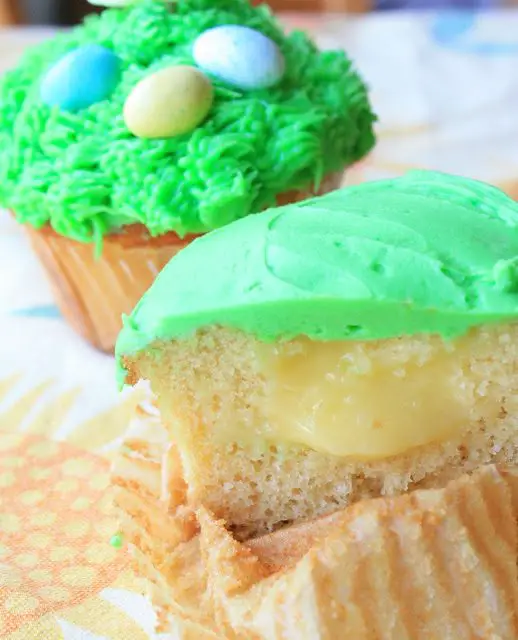
I cut into one of the cupcakes to show you the hidden, lemony goodness!
(I applied a smooth layer of frosting before adding the grassy look.)
The lemon curd is made via the microwave and I wanted to give it a try. It turned out perfectly, and delicious! I had to force myself to put down the spoon:) Oh my! Once I squeezed all the lemons it was fast and easy to make. I have a jar of it left in the refrigerator:)
Glory developed her perfect vanilla cupcake recipe after much research and experimenting and shared the results on Glorious Treats. I was very happy to benefit from her hard work:) I used her buttercream recipe too~YUM!
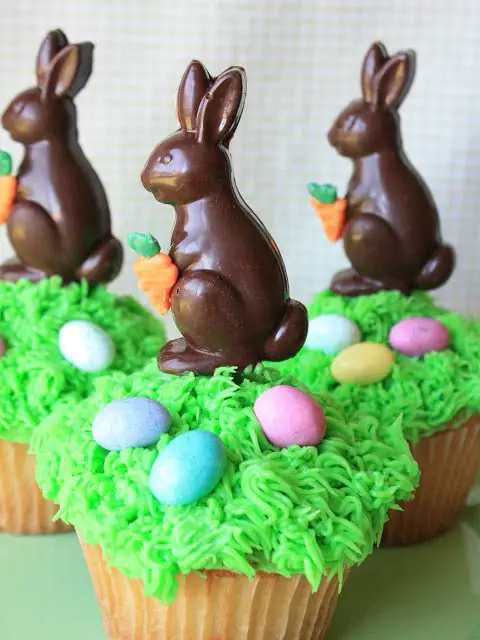
I ended up making five jumbo cupcakes. I wanted the large cupcakes in order to accommodate the 3.5-inch chocolate bunny lollipops. I made the bunnies with candy melts, lollipop sticks and a Nordic Ware mold that I bought at Target for under $3.00. Love it! They were so easy! I added the bunny lollipops to the cupcakes before I frosted them.
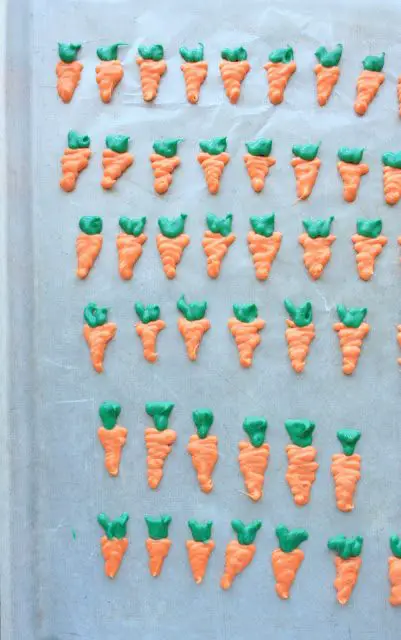
The tiny carrots were also made with candy melts. I had some left over from a St. Paddy’s Day treat and made the carrots at that time, to save for later. I used an icing bag and free-handed them onto wax paper. The carrots were attached to the bunnies with a dab of melted candy melt.
I think the bunny cupcakes ended up pretty cute, and tasty too!
Perfect Vanilla Cupcakes (by Glorious Treats)
Ingredients:
1 1/4 cups cake flour
1 1/4 teaspoons baking powder
1/2 teaspoon baking soda
1/2 teaspoon salt
2 eggs
3/4 cup sugar
1 1/2 teaspoons pure vanilla extract
1/2 cup oil
1/2 cup buttermilk
Directions:
1. Preheat oven to 350 degrees.
2. In a medium bowl, add cake flour, baking powder, baking soda and salt. Stir together with whisk, and set aside.
3. In the bowl of an electric mixer, add eggs and beat 10-20 seconds. Add sugar and continue to beat on medium speed about 30 seconds. Add vanilla and oil, then beat.
4. Reduce mixer speed to low and slowly add half of the flour mixture. Add half of the milk, then the rest of the flour and the rest of the milk. Beat until just combined. Scrap down the side of the bowl.
5. The batter will be thin. Pour batter into a muffin pan prepared with paper liners. Fill liners about 2/3 full.
6. Bake cupcakes in preheated oven for 12-14 minutes.
7. Cool in pan 1-2 minutes, then remove cupcakes from pan (carefully) and finish cooling on a wire rack.
8. Remove a piece of the middle of the cupcakes, from the top.
9. Spoon lemon curd into each cupcake.
Lemon Curd (Tidy Mom)
Ingredients:
1 cup white sugar
3 eggs
1 cup fresh lemon juice
zest of 3 lemons
1/2 cup unsalted butter, melted
Directions:
1. Whisk together sugar and eggs in a large microwave safe bowl. Add lemon juice, zest and butter and whisk until well combined.
2. Cook in microwave on high at one minute intervals, stirring after each minute. This should take about 5 minutes, depending on your microwave. Lemon curd is done cooking when it coats the back of a metal spoon.
3. Remove from microwave and cool completely.
4. Spoon lemon curd into each hollowed out cupcake.
5. Push the bunny lollipops into the middle of each cupcake
American Buttercream Frosting (Glorious Treats)
Ingredients:
1 cup (2 sticks) butter (salted, or unsalted)
1/4 teaspoon salt (if using unsalted butter) 4 cups powdered sugar 1 teaspoon pure vanilla extract
2-3 tablespoons heavy cream, half and half or milk.*
Directions:
1. In the bowl of an electric mixer, fitted with the whisk attachment, beat butter (on medium speed) until completely smooth (30 seconds to a minute).
2. Add salt (if needed).
3. One cup at time, add 2 cups of powdered sugar, beating after each addition. 4. Add vanilla and beat to combine. 5. Add about 1 tablespoon of cream, and continue beating.
6. Add the remaining 2 cups powdered sugar, one at a time.
7. Add an additional 1-2 tablespoons cream until desired consistency is reached.* If you want to pipe the frosting on cupcakes, the frosting should be nice and thick. Continue to beat another minute or so. The frosting should now be smooth and fluffy.
8. Use green food coloring to tint the frosting.
9. Apply a thin, smooth layer of icing to each cupcake.
10.. Using a #233 “grass” tip, decorate the top of the cupcake, and around the base of the bunny.
*(I ended up using only 1 tablespoon of milk and about a cup more of powdered sugar( for thicker icing) to help the “grass” hold its shape.)
11. Add some candy as decoration.
Bunny Mints
As mentioned in an earlier post I received a generous “candy kit” from the Wrigley company, to do with as I pleased. I thought it would be fun to stick with the bunny theme so I made some bunny mints from Altoids.
They were very easy to make and it only took me about 30 minutes to transform plain white mints into cute, little bunny mints.
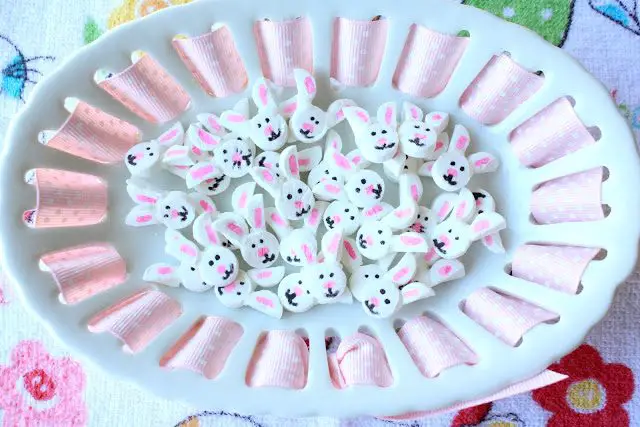
Bunny Mints
Ingredients:
One container of Altoids (1.76 oz.)
Royal icing (as the glue)
Pink and black edible markers
Procedure:
Head/face: Use the pink edible marker and put a nose on the face.
With the black marker, draw on eyes and mouth details.
Ears: I simply used a sharp knife to score one mint down the middle. I sawed it back and forth a little bit with a small, sharp knife, and then broke it in half in my hands. The “ears” don’t have to be perfect, but they did turn out pretty well!
Use a pink edible marker and detail the ears.
Adhere the ears to the head with royal icing.
Let dry.
Makes about 3 dozen bunny mints (It takes two mints for each bunny).
Perfect mints for after an Easter dinner:)
I was not compensated in any way by the Wrigley company for this post, and my opinions are my own.
Happy Easter!
Linked to:
Kitchen Fun and Crafty Friday
Bunny Hop Blog Party
Easter Show and Tell
Sweets for a Saturday