 If you read my blog regularly, you may remember that last year three new grandchildren (Addy, Max and Josh) joined our family:) Only two of our eight grandchildren live locally, so I don’t often get to bake birthday cakes for any of them:(
One of the two, Max, was born on the 4th of July, but this year his family was at a family reunion in Idaho on his birthday. We celebrated his birthday on July 15, but I still wanted his birthday cake to represent his Independence Day birth date.
I decided an American flag cake was in order, and zeroed in on Glory’s (Glorious Treats) beautiful blog. She included a wonderful tutorial which helped me immensely in putting this cake together.
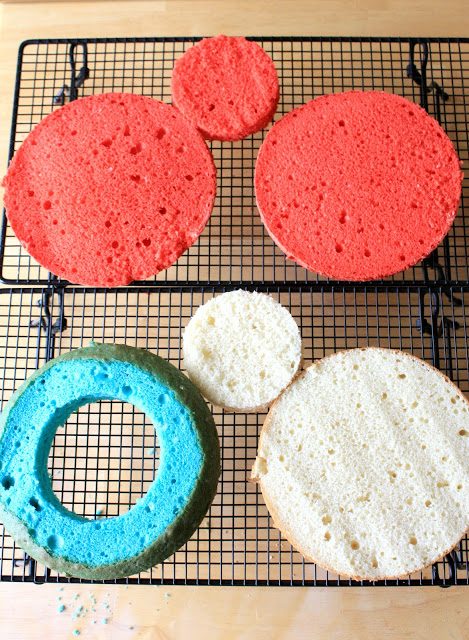 After the cakes were baked and prepped for construction, this is what they looked like. As I said, thank goodness Glory had photos, or who knows what my cake would have ended up looking like!?! 🙂
 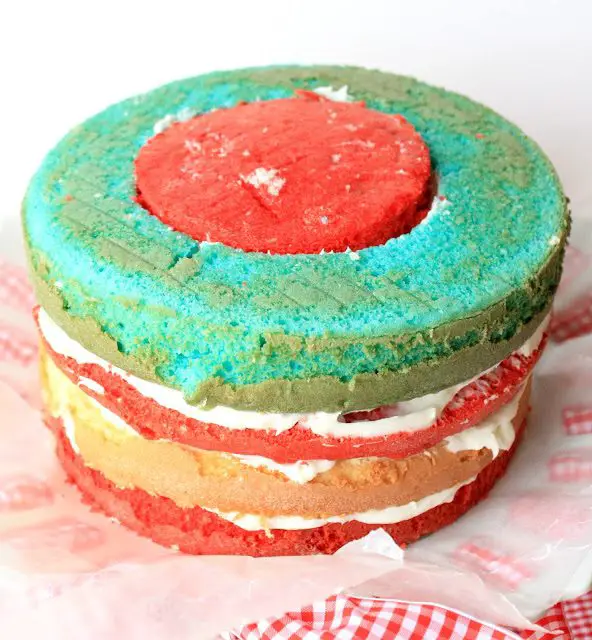 The next step was to stack and frost. It was rather fun as I watched this cake come together. After I frosted the entire cake and decorated it, I crossed my fingers and hoped that later when it was cut into, an American flag would appear!
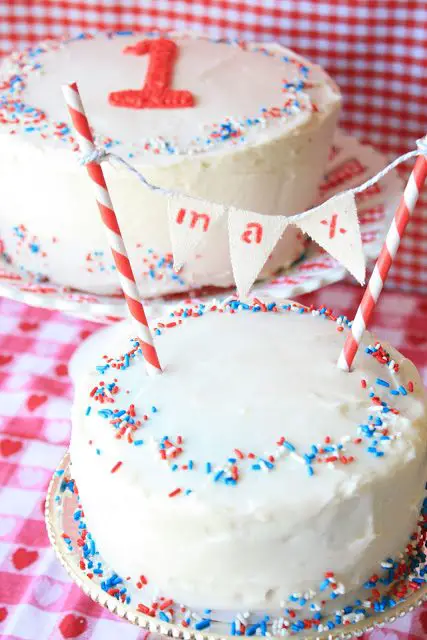
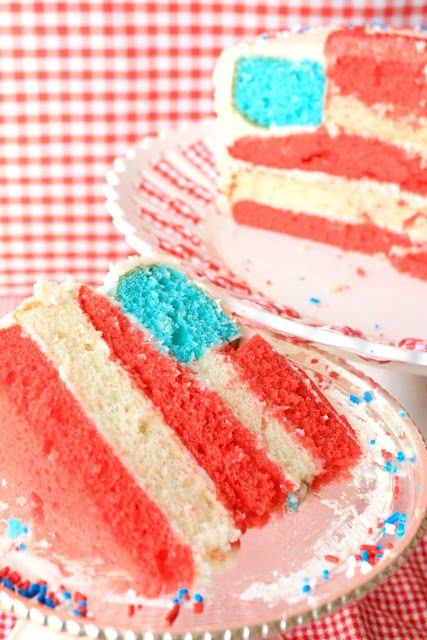 It did! Woo Hoo! I was pretty excited:) I decorated the cake simply, with sprinkles around the top and bottom borders. I topped it with a number 1, made from the icing tinted red and applied with an icing bag/decorating tip. The cake is frosted with American buttercream frosting (appropriate, don’t ya think?), also from Glorious Treats.
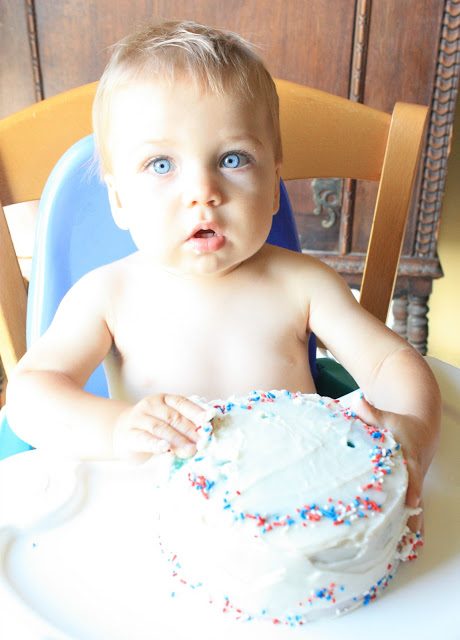
Max couldn’t believe his good fortune when his smash cake was set before him:)
 He thoroughly enjoyed himself!
Max’s 6-inch cake (no he didn’t eat it all) was a simple, marbled red, white & blue cake, made from a white cake mix with gel food coloring added). I filled and frosted it with Glory’s vanilla cream cheese frosting, which was delicious! His cake was decorated with a bunting. The fabric, stencil (A-Z) and twine were part of a kit (I can’t find the label to give credit!?!), but I used my own straws that I had on hand, as well as more sprinkles.
Even though Independence Day is over, this cake would be perfect for Labor Day in September, a U.S. military event, or to support America during the Olympics.
American Flag Cake
1. Prepare two boxes of white cake mix, each mix in a separate bowl.
2. Add red food coloring to one of the bowls and incorporate.
3. Divide up the other mix into two bowls and add blue coloring to one, leaving the other one white.
4. Bake each of the four cakes in 8-inch cake pans, each lightly greased, and lined with parchment paper.
5. Cool cakes completely.
6. Cut each of the red cakes in half horizontally.
7. Cut a 4-inch circle (I used a round cutter) of cake from one of the red rounds.*
8. Cut the white cake round in half horizontally.
9. Cut a 4-inch circle of cake from one of the white rounds.*
10. Cut a 4-inch circle of cake from the blue round cake.*
*Save the scraps for cake pops at a later date:)
You should end up with a set of cakes as in the second photo.
11. Starting from the bottom, stack the cakes: red, white, red, blue, with a thin layer of frosting between each layer of cake.
12. Apply a thin layer of icing around the inside of the 4-inch opening at the top.
13. Gently, but firmly, place the 4-inch white round inside the opening, followed by the 4-inch red round.
14. Frost the cake completely and decorate as desired.
15. Refrigerate until ready to serve, and be sure to cut slices with a sharp knife (I used a serrated bread knife) for “clean” cuts.
ENJOY!
Linked to:
I’m Lovin’ it Party
Inspiration Friday
Kitchen Fun and Crafty Friday
Weekend Wrap Up Party