
I’m so excited about this post, and truthfully, it’s a long time coming! I’ve never really delved into it on here, but my husband and I love to entertain. For example, my mom’s 50th birthday was last month, so to celebrate we made a 5-course Italian feast for the entire family. We fit 14 people in our little condo, and everyone had a great time drinking wine, snacking on vegan cheeses, and stuffing their faces with simple and authentic Italian fare. It was amazing.
We know that not every dinner party can be like that, so we also embrace more loosy-goosy hosting opportunities, especially as we get into fall (and the holidays) when entertaining can become more frequent and last minute. With out-of-town visitors, family popping in, and friends who just want to hang, you never really know when you’re going to find people in your house. I love this about fall and winter. Staying in and eating with loved ones is a perfect time to enjoy company and relax and reflect. Because of this, my husband and I have developed some tricks over the years to make sure we’re always ready to host cheaply and on a whim.
The most important step to last-minute hosting is being stocked ahead of time. It’s totally doable in any sized space, and it saves you time and money in the long run. When we first moved into our beloved Hyde Park apartment, we had absolutely no kitchen storage. Still, I managed to make and store fall cookie plates, Christmas cookie plates, Chex Mix, etc. Where there’s a will there’s a way.
That brings me to my top three tips to Fall Hosting on a Whim and a Dime.
- Make, Appreciate, and Love Freezer Meals
- Batch Cook Goods Ahead of Time
- Stock the Fridge and Pantry Early and Cheaply (w/ coupons and sales)
Tip 1: Make, Appreciate, and Love Freezer Meals
Freezer meals are exactly as they sound. They are meals stored in the freezer. Some are fully cooked and only need to be re-heated. Some are prepared and then frozen so they can be thawed and fully cooked at a later date. Soup, lasagna, baked pasta, enchiladas, pierogis – these are all great examples of freezer meals.
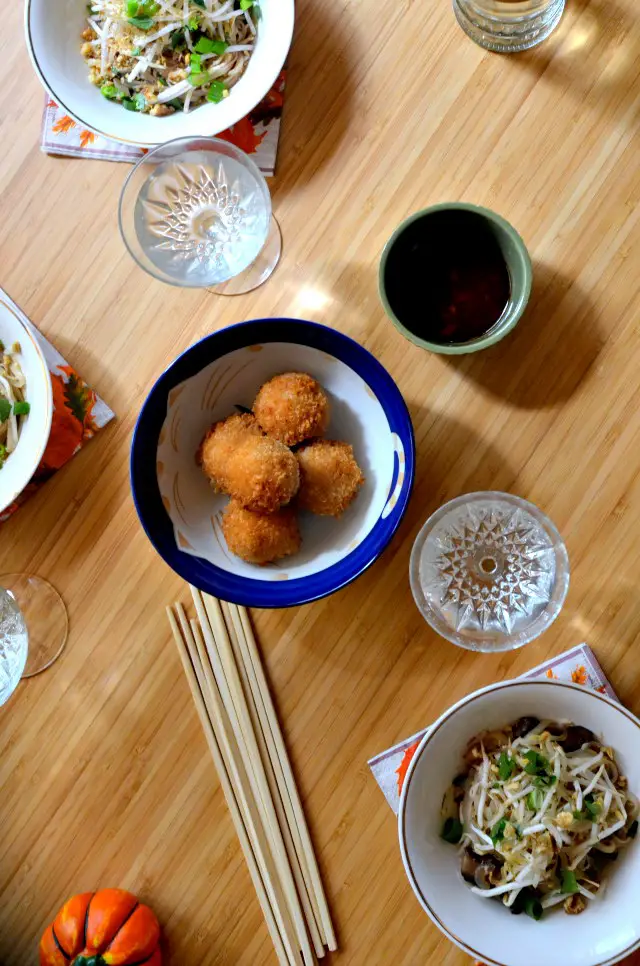
Having meals frozen and ready to go is a must if you host a lot in the fall. Today I’m sharing two excellent freezer meals to get you started: Rosemary Roasted Chickpeas and Fall Vegetables w/ Mashed Potatoes and Gravy and Autumn Pad Thai w/ Vegan Red Thai Curry Rice Balls.
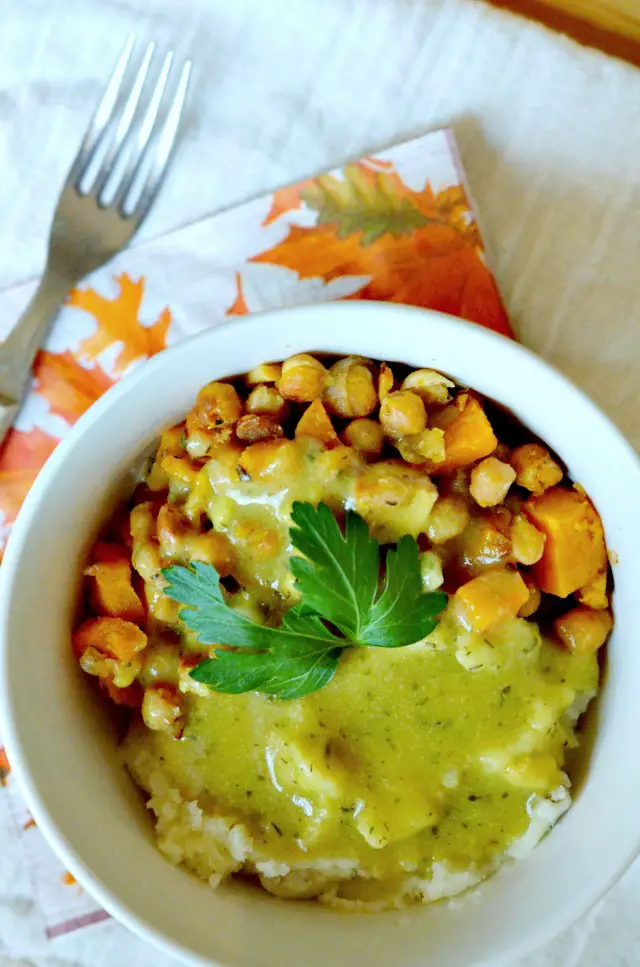
The Rosemary Roasted Chickpeas and Fall Vegetables w/ Mashed Potatoes and Gravy is pure fall in a bowl. Roasted seasonal vegetables and warm chickpeas served over mashed potatoes, covered in a savory herby gravy – how good does that sound? This freezer recipe contains components that are already cooked as well as components that will need to be cooked day of. Everything is prepared and ready to go, though, so the energy it takes to prepare from the freezer is minimal.
Plus it’s going to make your kitchen smell divine.
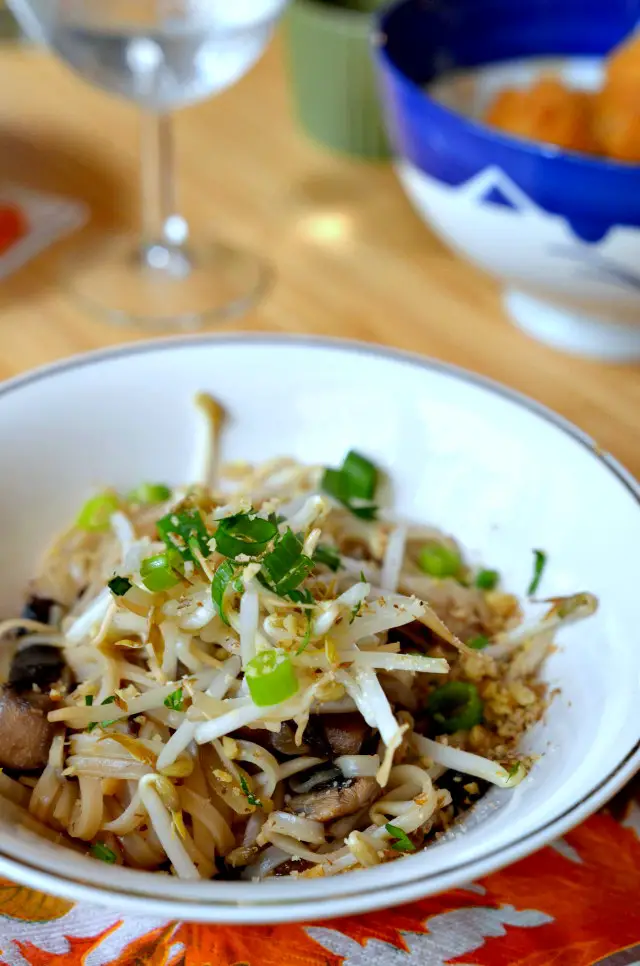
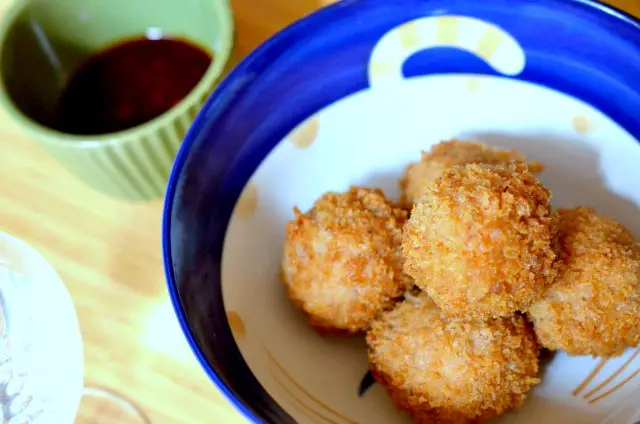
The Autumn Pad Thai with Red Curry Rice Balls is something really special to serve guests. The rice ball appetizers are crunchy on the outside and hot and flavorful on the inside. If you’ve never had a breaded and fried rice ball, you’re in for such a treat!
My Autumn Pad Thai is great, although it is not bona fide at all. However, it does borrow from authenticity. It contains tamarind and vegetarian fish sauce which is legit, but it also uses walnuts instead of peanuts, portobello mushrooms, and parsley, so yeah – I’m doing my own thing with this recipe. It’s so good though! People go nuts for it, and it freezes really well when fully cooked.
You can store freezer meals in freezer-safe plastic or Tupperware. I did for years, and it works just fine. However, this fall I’ve been using the FoodSaver® Vacuum Sealer FM5330 to save and preserve our food, and the difference it makes has really surprised me. With standard packaging, I would carefully label and date everything I made and was sure to serve it within a couple weeks. After that, we would run into freezer burn and freezer taste. You know that “taste” I’m talking about? When something is in there for too long and it starts to taste like dry cold air?
But with a FoodSaver®, I’m working with a tool that is best for items needing long-term freezer storage. The FoodSaver® and its multi-layer, BPA-free vacuum-seal bags seal effectively without gaps and are literally designed to block out air (and that taste). This means that the freezer meals we make can stay fresh up to 5 times longer than standard plastic bags, Tupperware, foil, etc.. This is great news if you’re into batch cooking.
(Psst – if you were thinking about buying a FoodSaver®, doing so could win you a trip to NYC with the FoodSaver® Sweepstakes below. Keep reading!) 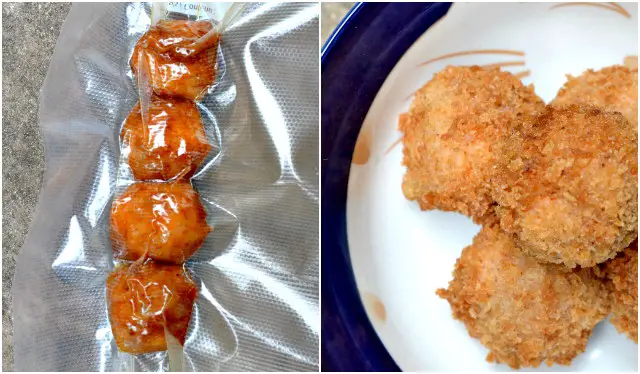
Tip 2: Batch Cook Goods Ahead of Time

Family members who visit us from out of town expect to find two things in our house this time of year: Chex Mix and cookie plates. I think it’s my grandma’s influence. She always has little bowls of homemade Chex Mix on her side tables and plates of cookies just hanging out. I always feel comfortable and happy at her house, and I feel like most of my efforts in our own home is to just replicate the feeling of Grandma’s.
Cookie plates can be easy to assemble if you let them be easy. The secret to a good cookie plate is the assortment, right? I want a lot of variety, and I used to insist on making all the cookies myself. Not anymore. That was crazy and just made more work. So now I cheat: I make two or three different cookies, and then fill in the rest of the plate with store-bought. Yes, people can tell, but no one cares. Especially if you include their favorites. Right now, our freezer cookie plate includes two types of homemade pumpkin cookies, store-bought whoopie pies, and store-bought fudge striped shortbread. It’s all delicious.
You can totally freeze a cookie plate as is (see the pic below). I like to do this because it just makes things easier. To serve your freezer cookie plate, just take it out of the freezer, remove it from the bag, and allow it to thaw at room temperature. It doesn’t take very long at all! Under an hour, usually.

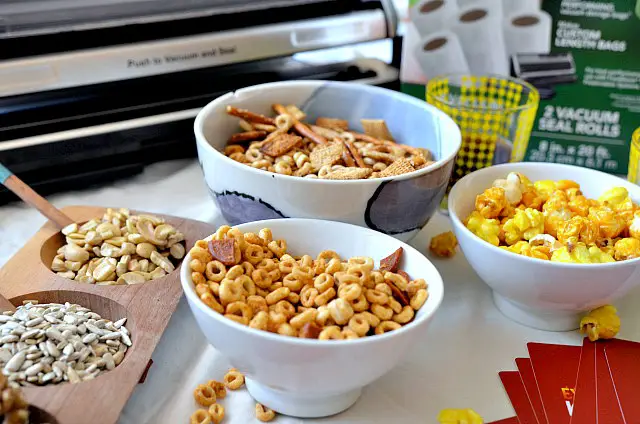
For the Chex Mix, I make huge, ginormous batches. I need some for us to snack on, to put out for guests, to take to people for host gifts, etc.. The only option is to make a ridiculous amount. While I make more Chex Mix than anything else, I also like to make the following in batches for visitors. Like I said, we’re extra:
- cheese
- wheat crackers
- cheese crackers
- candy corn
- roasted nuts
- cookies
Snacks we prefer to make the day of (with stocked pantry goods) include
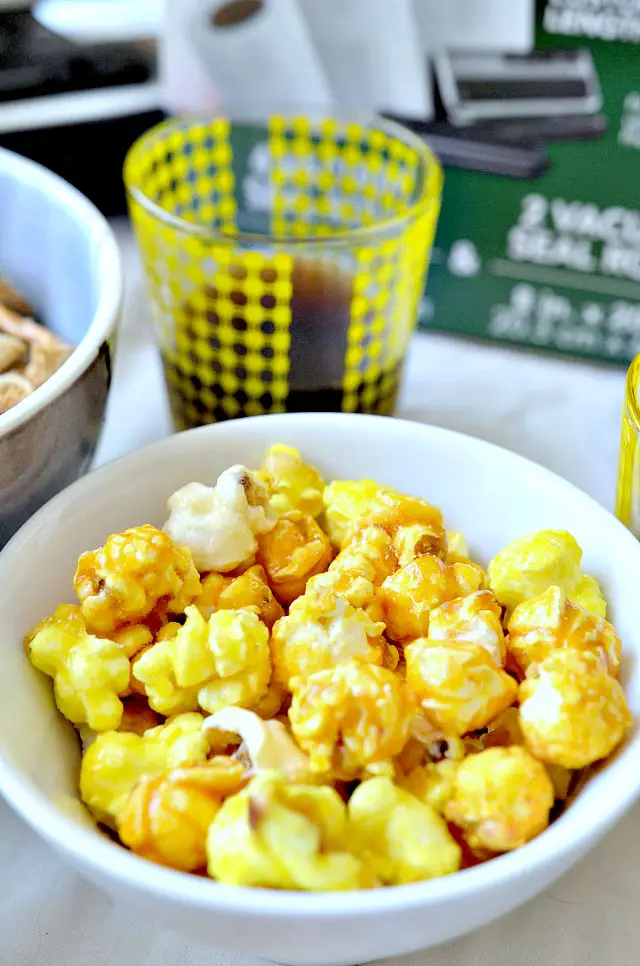
- popcorn (guests love popcorn!)
- cheese plates
- chips and salsa
- chocolate, fruit, and nut plates
Having snacks that you can put out is essential. It comes in handy when you have casual get-togethers for cocktails or to watch football. They also help keep folks happy while you’re in the kitchen preparing dinner. And the cookie plate can serve as both snack and dessert. Efficient! Just pair it with some after dinner coffee, and watch absolutely no one complain.
Tip 3: Stock the Fridge and Pantry Early and Cheaply (w/ Coupons and Sales)
This is key to staying prepared for guests. Even if you have no freezer meals, even if you haven’t gotten around to batch cooking snacks. If you have a stocked pantry, you can feed anybody.
The real trick to stocking your pantry well is to do so inexpensively. Buy items on sale, wholesale, or even at discount stores. Don’t sleep on places like Dollar Tree or Big Lots. They often have brand name foods for a lot cheaper than the grocery store. Just check those expiration dates to make sure the food you buy isn’t expiring like tomorrow.
A lot of food goes on sale in the fall too. That’s because it’s a big season for cooking. Check your grocery stores for sales on these items and stock up when they’re cheapest:
- baking chips
- candy and chocolates
- non-dairy whipped cream
- canned and fresh pumpkin
- nuts
- canned and fresh cranberries
- coffee
- tea
- hot chocolate
- cake mixes
- canned and boxed soups and broth
- thanksgiving food like potatoes, stuffing, pie crusts, pies, etc.
The following may or may not be on sale, but you need them in your pantry. Look for these at wholesale stores, discount stores, or use coupons:
- crackers
- tortilla chips
- potato chips
- salsa
- garbanzo beans and tahini (for hummus)
- popcorn
- nut mixes
- nice chocolates
- vegan sprinkles
- soda
- sparkling water
- pasta
- good olive oil
- plenty of good quality dried herbs
- garlic
- lemons and limes
- canned tomatoes
- lentils
- split peas
This pantry list has the makings that we need for an impromptu dinner party. Of course, everyone is different. If you have certain meals that you like to throw together for guests, stock ingredients for those as well. A stocked kitchen is a comfortable kitchen whether you have guests coming, or you just find yourself too busy to think about food.
Bonus Tip: Utilize a FoodSaver® A FoodSaver® is genuinely made to make entertaining easier. If you host a lot this time of year, I recommend going down to Kohl’s to take a look at the system I use here. It can make cooking ahead, batch cooking, and preserving more effective and affordable than standard food storing. Personally, it’s really opened up my options for planning ahead.
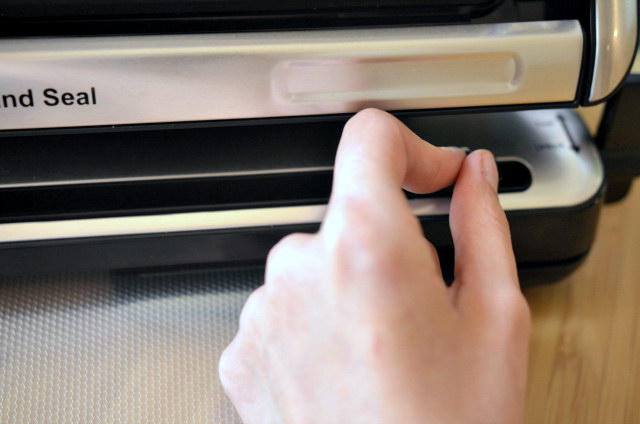
Additionally, it’s lightweight (although a little bulky for storage, but not too bad), and incredibly easy to use. I’m a notorious manual ignorer, and even I could do it. See the process step-by-step:
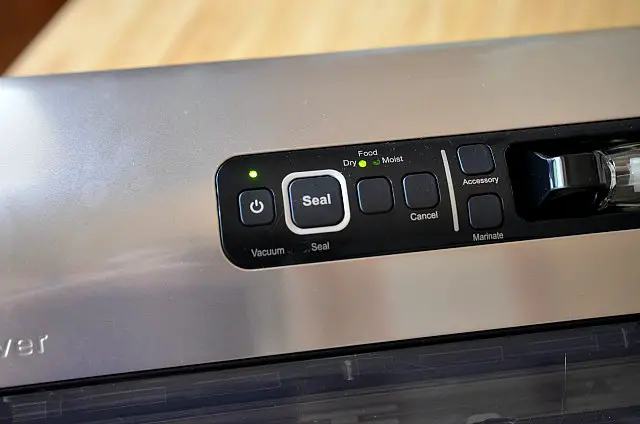
First, you need to turn it on. Just plug it in and press the power button. Easy!
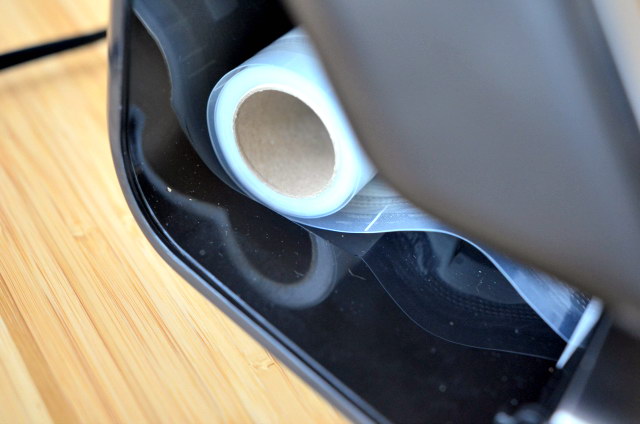
If you’re using the Heat-Seal Rolls (as opposed to the vacuum seal bags or vacuum zipper bags), you’ll need to load it. All you need to do is the place the roll in the round opening in the back…
… and then pull the plastic through the bottom.

From here, you make the first seal for the bag by flipping the switch on the bottom left to “Seal”.
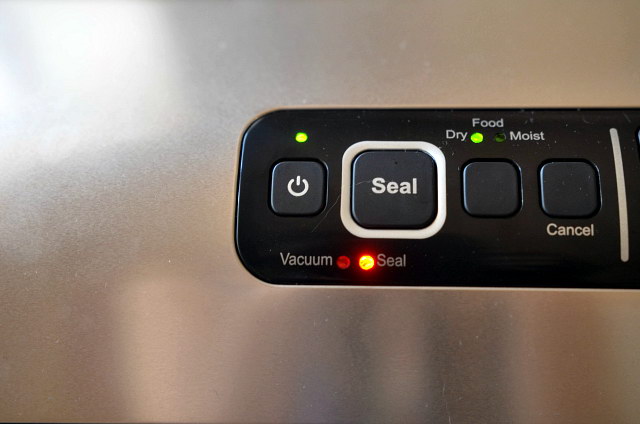
You’ll see this red light appear on top of the FoodSaver®. Don’t touch anything until it goes off on its own.
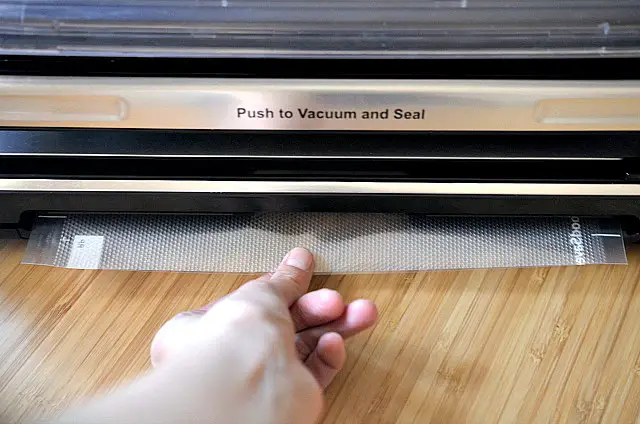
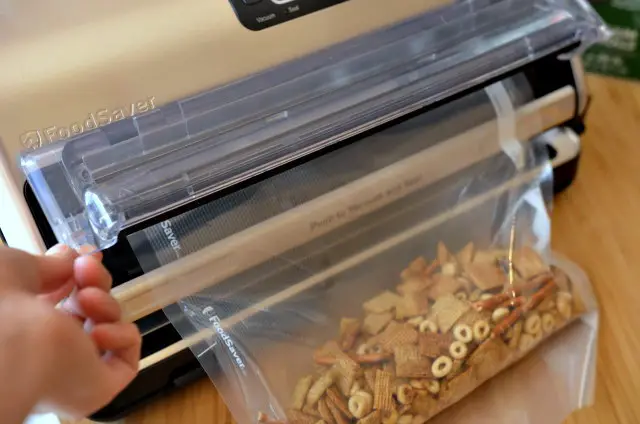
Now, pull out the sealed plastic to the size that you want, adding about two extra inches to the top. Once you have the correct size, use the slider to cut the roll.
Congrats! You’ve made a bag.
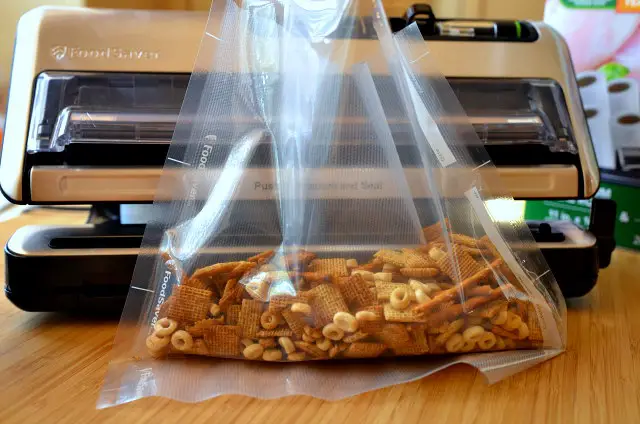
Time to fill it up. Here, I vacuum sealed our favorite Chex Mix. Because it’s easily crunched, I recommend freezing cereal mixes before vacuum sealing. Just pour the mix onto a cookie sheet and place it in the freezer until frozen. That will give the mix a little more heft to minimize squeezing from the vacuum seal.
Once your bag is appropriately filled, place it under the little window. You don’t have to “insert it” or anything crazy. Just lift the window, place the bag there (keep it straight), and then close the window.
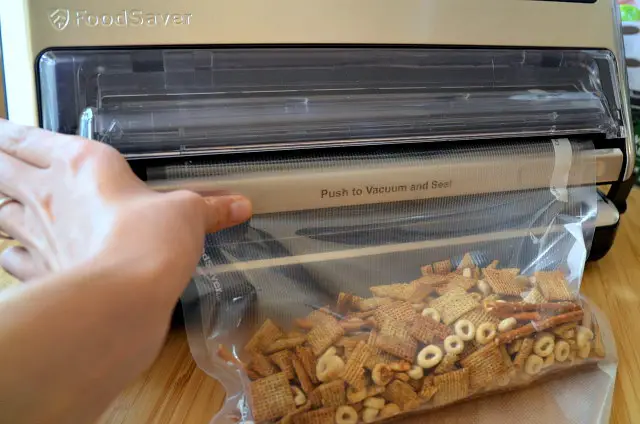
Push the spot that says “Push to Vacuum and Seal”, and watch the magic happen.
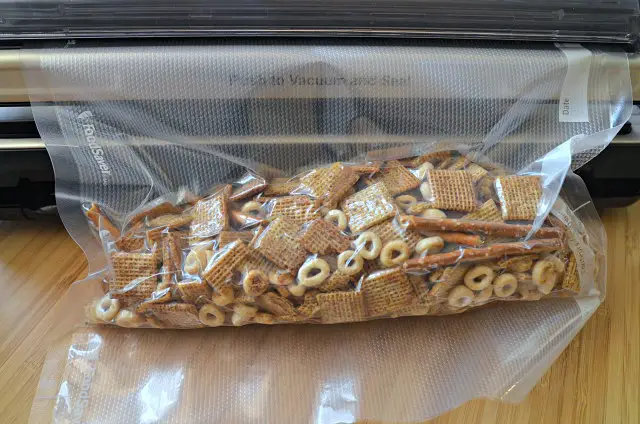
Look at that vacuum! When it’s done vacuuming, it will automatically seal – turning on that red light again. Like before, don’t touch anything until the red light turns off. And that’s it! Easy, right?

A few more things to note about the FoodSaver® Vacuum Sealer FM5330:
- It keeps food fresh in less time and fewer steps* than previous FoodSaver® systems.
- The system comes with vacuum seal bags and rolls, vacuum zipper bags and containers designed to work together with vacuum sealers for optimal performance. The premade bags are great for when you’re in a rush!
- It works differently for dry and wet foods, so be sure to indicate which you’re sealing by using the button on top. Wet items can sometimes get messy if any liquid is vacuumed out. Luckily there is an easy to remove drip tray under the aforementioned window.

Are you going to buy a FoodSaver® soon? If so, be sure to enter the FoodSaver Sweepstakes between 9/23/18 – 10/21/18 for a chance to win a weekend for two in New York City. Stocking up with FoodSaver® bags and rolls this harvest and holiday season has its perks. Every bag and roll purchase gets you closer to NYC! *Compared to FoodSaver® V4440 Models
I really truly love fall cooking. It’s the coziest, homiest, and warmest time to be in the kitchen, and the foods are just the most delicious. Having wonderful dishes prepared and ready to go helps us share with loved ones what we adore about this time of year: the opportunity to relax and renew. I hope that as you get ready for the harvest season you can experience these joys on your own . So go forth, and prepare, shop, preserve, and freeze. From there all you have to do is invite people over, and you’ll be on your way to a truly abundant fall.
Rosemary Roasted Chickpeas and Fall Vegetables w/ Mashed Potatoes and Gravy
- 2 15 oz cans chickpeas
- 1 1/2 lbs butternut squash, cut into medium-sized chunks
- 1 medium-sized onion, cut into medium-sized chunks
- 2 large carrots, cut into medium-sized chunks
- 1 large parsnip. cut into medium-sized chunks
- 1 sprig fresh rosemary, chopped
- 2 cloves garlic, minced
- 3 tablespoons olive oil
- 1 teaspoon salt
- 1/4 teaspoon paprika
1. Drain and rinse the chickpeas with cold water. Pour them into a large mixing bowl with the remaining ingredients. Use a spatula to combine everything, making sure the vegetables are well coated in the oil. Transfer the chickpea/vegetable mix to a vacuum seal bag, and vacuum seal the mix using your FoodSaver®. Alternatively, you can transfer the chickpea/vegetable mix to a large ziplock freezer bag. Just push out as much air as possible before sealing.
Vegan Freezer Mashed Potatoes and Gravy
Ingredients
- 3lb Yukon gold potatoes, cut into 1/2 inch slices
- water for boiling
- salt
- 2-3 tablespoons plant-based butter or margarine
- 2 teaspoons garlic powder
- 1/4 cup or more of original unsweetened plant-based milk
- 1 medium sized onion, small diced
- 2 garlic cloves, minced
- 6 tablespoons all-purpose flour
- 6 tablespoons nutritional yeast
- 1 teaspoon dried thyme
- 1 teaspoon dried oregano
- 1/2 teaspoon dried rosemary
- 4 cups vegetable broth
1. Add the potatoes to a large pot with enough water to cover them by a few inches. Sprinkle in a few hefty shakes of salt, and bring the potatoes to a boil over medium-high heat. Let the potatoes boil until they pierce easily with a fork – about 20-30 minutes.
2. Drain the potatoes, and transfer them back to the pot. Use a potato masher to mash the potatoes until you have medium to large chunks. Add the butter, garlic powder, and milk, and continue mashing until you reach a smooth consistency. Season with salt to taste, and set them aside to cool almost completely. Meanwhile, make the gravy.
3. Heat the oil in a large saucepan over medium heat. Add the onions and cook, stirring frequently, until they turn translucent. Add the garlic, flour, nutritional yeast, and herbs to the pan, and stir them in to coat the onions. When the garlic is quite fragrant whisk in the vegetable broth. Whisk continuously until the gravy has thickened enough to coat the back of a spoon. Season it with salt to taste. At this point, you can leave the gravy as is, or puree it for a smoother consistency. It’s up to you. 4. Store the potatoes and gravy separately in vacuum sealed bags. Remember to use the “moist” option for these. You can also store them in ziplock freezer bags if you’re not using a FoodSaver®. As always, just be sure to squeeze out as much air as possible before sealing and freezing. How To Make and Serve Rosemary Roasted Chickpeas and Fall Vegetables w/ Mashed Potatoes and Gravy from the freezer
1. Remove the chickpea/vegetable mix, mashed potatoes, and gravy from the freezer, and heat your oven to 375°F. Line a large baking sheet with parchment paper. 2. While your oven preheats, place the bag of chickpeas and vegetables in a bowl of hot water. This will thaw them enough to work with. Once the oven is preheated, pour the vegetables onto the prepared baking sheet. Place the vegetables in the oven, and allow them to roast for 60-90 minutes. To ensure even roasting, stir the vegetables every 20 minutes. The vegetables are done with they’re soft and caramelized. The chickpeas may dry out a little bit, and that is totally fine! When the vegetables and chickpeas are almost done (about ten minutes away), reheat your mashed potatoes and gravy. 3. Transfer the mashed potatoes to a saucepan over low heat, and stir often until they are heated through. Feel free to add more plant-based butter or milk if they have dried out. 4. Pour the gravy into a separate saucepan over low heat, and whisk occasionally until the gravy is heated through and smooth. 5. Remove the chickpeas and vegetables from the oven, and taste them for salt and pepper. 6. To serve, add mashed potatoes to each guest’s bowl, and top with a good scoop of the chickpeas and vegetables. Drizzle with plenty of gravy and a little fresh parsley if you have it.
Autumn Pad Thai w/ Vegan Red Thai Curry Rice Balls
- 1/2 cup tamarind concentrate (available in well-stocked grocery stores, Asian markets, and online)
- 1/2 cup vegetarian fish sauce (available in Asian markets and online or make your own)
- splash soy sauce
- 2 tablespoons palm or brown sugar
- ground cayenne pepper to taste
- 1 tablespoon canola oil
- 2 teaspoons sesame oil
- 1 small onion, thinly sliced
- 8 oz portobello mushrooms, thinly sliced
- 2 cloves garlic, minced
- 8 ounces dried rice stick noodles, made according to the package directions
- 1/2 cup toasted walnuts, chopped
- 2 scallions, cut into ½ inch segments
1. In a small pot, mix together the tamarind, fish sauce, sugar, and cayenne. Give the sauce a taste and adjust the sweetness/saltiness to your preferences. Tamarind concentrate and vegetarian fish sauce can vary in sweetness and saltiness so it’s best to add sugar/soy sauce according to your taste. Put the sauce over low heat and stir occasionally until the sugar is dissolved. Remove the sauce from the heat. 2. In a large pan or wok, heat your oil over medium-high heat. When the oil is hot, add the onions and portobello mushrooms and stir-fry until they’re nice and golden. Add more oil if need be. 3. Add the garlic, noodles, and the walnuts. Give the whole thing a good stir with a few choice tosses. 4. Add the sauce and toss everything to combine. Stir in the scallions, and adjust the seasoning as needed.
5. Take the Autumn Pad Thai off the heat and allow it to cool to the touch. Once cool, vacuum seal the dish using your FoodSaver®. Alternatively, you can store it in a ziplock freezer bag.
Vegan Red Thai Curry Rice Balls
Ingredients
- 3 cups water
- 15 oz full-fat coconut milk
- 2 cups medium grain white rice
- pinch of salt
- 1/4 cup red Thai curry paste
- 1 tsp garlic powder
- 1/2 tsp onion powder
- 15oz canned diced tomatoes, drained
- 2 cloves garlic
- 3 tablespoons cilantro, chopped
- 16-24 oz vegetable oil
- 1/2 cup milk
- 1/4 cup flour
- 1 tablespoon ground flax seed
- few shakes vegetarian fish sauce
- panko
1. Bring the water and 1 cup of the coconut milk to a boil in a medium saucepan over medium-high heat. Add the rice and a pinch of salt, and return the mixture to a boil.
2. Lower the heat to a low and cover the pot. Cook for 18-20 minutes, until the liquid is fully absorbed and rice is tender. While the rice cooks, make the curry sauce.
3. In a blender combine the remaining coconut milk, red curry paste, garlic powder, onion powder, tomatoes, garlic, and cilantro. Blend until you get a smooth sauce.
4. When the rice is done, fluff it with a fork. Add the curry sauce, and carefully fold it in until every piece of rice is covered. Use to the back of a spatula to pack the rice down into the pot. You want to pack it pretty tightly to ensure easy balling later. Store the rice in the refrigerator to cool completely.
5. Once the rice is cool, pull it out of the fridge to make the balls. Use an ice cream scoop or a tablespoon to make 2 inch sized rice balls. They should hold together easily to allow you to scoop and roll them into the right shape and size. Once you roll all of the rice into balls (you should get about 15-20), place them back in the refrigerator for 15-20 minutes.
6. While your rice balls rest, set up your oil and breading station. Pour the vegetable oil into a large pot over medium heat and heat the oil to 350ºF.
7. While the oil heats up, whisk together the milk, flour, flax seed and vegetarian fish sauce in a mixing bowl. The texture should be like a thinner pancake batter. Add more milk if need be. Pour the panko into a separate mixing bowl.
8. Remove the rice balls from the fridge, and start breading. First, dip a rice ball into the flour/milk batter. Then roll it in the panko. Continue the process until each rice ball is breaded.
9. Once the oil reaches 350ºF, fry 3-4 balls at a time until they are golden brown all around. Allow the fried ball to drain on a cooling rack over paper towels. Continue until each ball is fried.
10. Let the rice balls cool completely before vacuum sealing using your FoodSaver®, or storing in a ziplock freezer bag.
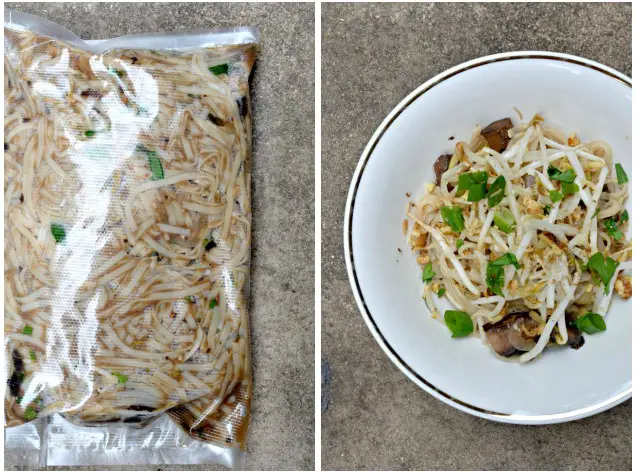
How To Make and Serve Autumn Pad Thai w/ Vegan Red Thai Curry Rice Balls from the freezer
Ingredients
- 4 cups bean sprouts
- 1/2 cup toasted walnuts, chopped
- 2 tablespoons fresh Italian parsley, coarsely chopped
- Lime wedges
1. Remove the Autumn Pad Thai and Red Thai Curry Rice Balls from the freezer and allow them to thaw at room temperature for 20-30 minutes. Meanwhile, preheat your oven to 350ºF. 2. Place the frozen rice balls on a greased baking sheet. Bake for 20-30 minutes, until they are completely heated through. Serve immediately – no dipping sauce required!
3. While the rice balls bake, pour the Pad Thai into a large wok or saucepan over medium-high heat, and stir and toss with tongs until it is completely heated through. Stir in two cups of the bean sprouts. When you’re ready to serve, evenly distribute the Pad Thai among 4-6 plates. Top with the remaining bean sprouts, walnuts, and parsley. Serve with lime wedges.