 I don’t know about you, but this year Christmas sneaked up on me when I wasn’t looking! Arrrgghhhh! It is in three days and I am just now winding down and “letting go” as I realize that I am not going to have time to make/decorate many of the Christmas cookies that I had planned on. Fortunately, a few of the designs are not solely Christmas, but fit also into the “winter” category:)
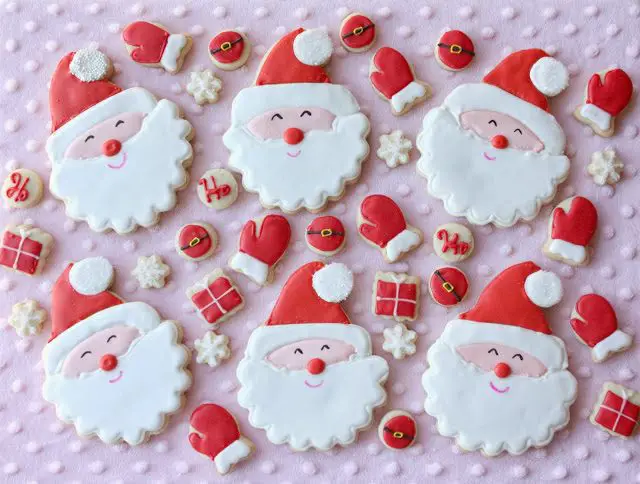
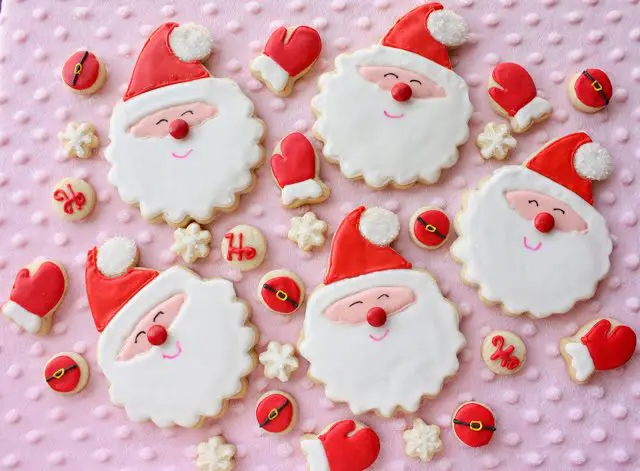
Santa is strictly Christmas so I was happy to be able to make these cookies. The smiling Santas were inspired by this design from the talented Amy of Living Locurto. So cute!
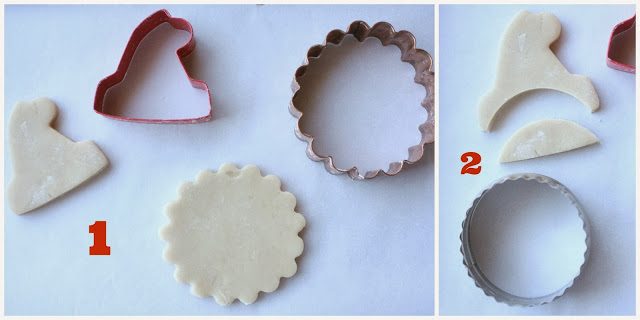 I utilized a bit of cutter creativity to achieve this Santa design as closely as possible. I had a Santa hat cutter and a scalloped, round cutter on hand which merged together nicely.
1. From the rolled out dough, cut out a Santa hat and a scalloped, round shape of similar size.
2. Using a round cutter, cut out a portion of the bottom of the Santa hat
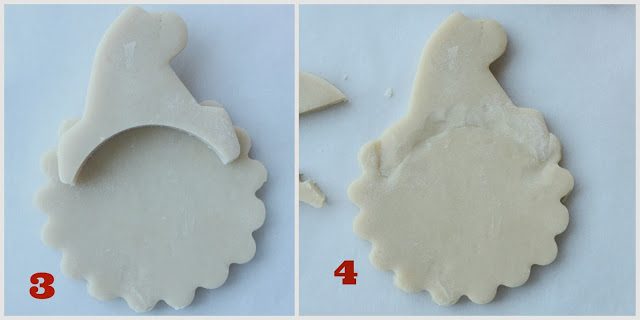
3. Position the altered hat on top of the scalloped, round cut-out until it looks satisfactory. (I counted the scallops so that I could make each Santa as similar as possible.) Use a small, sharp knife to cut away the excess dough.
4. Position the hat into the newly formed spot on top of the scalloped round and press them together gently. Bake the cookies.
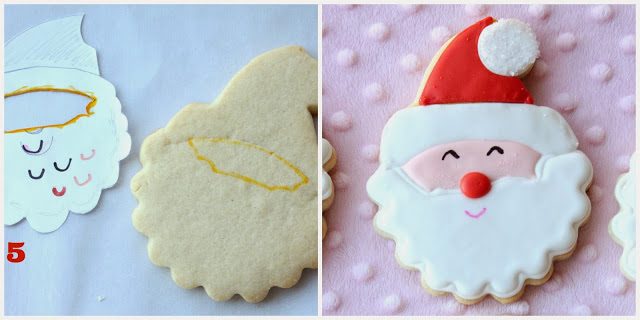 5. Print out (or draw) your design, cut it out (including cut-outs to help with details, the face in this instance) and place it on the baked cookie. With an edible marker, trace around the face. Decorate the cookie. (Excuse the scribbling on my paper template.)
(FYI: For the mittens I used a “goldfish cracker” cookie cutter:)) Ta da, the finished cookie is on the right, of course:)  I had a lot of fun with this design and they ended up being generous size cookies. I was happy about that because these cookies were sent to Melissa of Melissa Joy and Fanciful Cookies. She was the highest bidder as part of a benefit bake sale organized by Tina of Pinay in Texas Cooking Corner for typhoon relief in the Philippines. Tina did a great job and met her goal for funds raised.
 I was pretty excited that someone had bid on my cookies, and was even more excited when I discovered that it was someone I knew (but have never met) through blogging! I began to get a bit intimidated though, when I realized that I would be decorating cookies for a very talented cookie decorator, one of my favorites as a matter of fact! I knew my cookies would be kindly received and appreciated though, because Melissa is also sweet:)
Smiling Santa Cookies
Sugar cookie dough
Royal Icing Red gel paste coloring Pink gel paste coloring White sparkling sugar Pink edible marker Black edible marker 1. Roll out the cookie dough and prepare the cookies according to steps 1-5 above. 2. After step 5, use some royal icing and a #2 tip to outline and then fill, the face section. (I used royal icing with a drop of pink royal icing for the face color.) Let dry for about 20 minutes and then use the white royal icing to outline, and then fill, the beard/hat rim, and the hat’s pom pom sections. (Add the white sanding sugar to the pom pom while the icing is still wet.) Let the white royal icing dry for a few hours hours (or overnight). 3. Using the red royal icing, outline and fill the hat, and then the nose. (For some of the noses I used a red m&m. It was easy, looked cute, and I didn’t have to worry about the red “bleeding”.) Let dry completely. 4. Using edible marker, add the eye details and the mouth.
Merry Christmas!