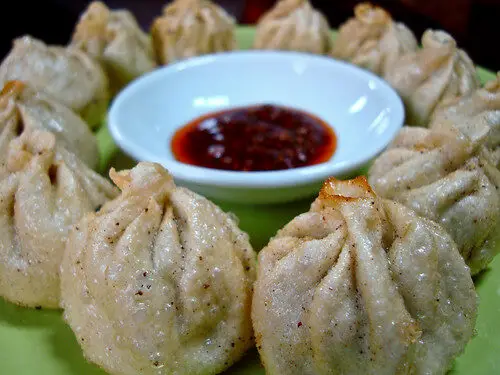
Momos are tasty dumplings that are popular in Tibet, Nepal, Bhutan and parts of India bordering the Himalayas. They can be steamed or fried (see How To Make Chinese Steamed and Pan-fried Dumplings), and come with a variety of fillings. Here’s the recipe for the steamed version, courtesy of YoWangdu’s Tibetan Food Recipes which my London-based Tibetan friend found online for me. If you don’t eat meat, vegetarian ones are just as good. Momos are tricky to make, but well worth the effort! I ate these fried momos at the Tibet Cafè in Beijing on my recent trip to China, served with a lovely chilli dipping sauce.
The Dough:
Mix plain flour and water well by hand and keep adding water until you make a smooth ball of dough. Knead the dough until it is flexible. Leave it in a pot with the lid on while you prepare the rest of the ingredients.
Meat Momo Filling:
Mix one pound of minced beef, chopped onion, one pound of chopped cabbage, three tablespoons of soy sauce and half a bowl of chicken, beef or vegetable bouillon. Add all the ingredients into a big bowl and mix well using your hands.
Shaping the Momos:
When dough and filling are both ready, it is time for the tricky part of making the dumpling shapes. For this, place the dough on a chopping board and use a rolling pin to roll it out quite thinly. It should not be so thin that you can see through it when you pick it up, nor should it be quite as thick as a computer floppy disk. Somewhere between the two should work out.
After you have rolled out the dough, you will need to cut it into little circles for each momo. The easiest way to do this is turn a small cup or glass upside down to cut out circles about the size of the palm of your hand.
Of course, you can also make the circles with the more traditional, and more difficult, way of pinching off a small ball of dough and rolling each ball in your palms until you have a smooth ball of dough. Then, you can use a rolling pin to flatten out the dough into a circle, making the edges more thin than the middle. This is much harder to do, and takes more time, though many Tibetans still use this method.
Now that you have a small, flat, circular piece of dough, you are ready to add the filling and make the momo shapes. There are many, many different choices for momo shapes. The most common is the basic round momo and the half-moon shapes. Of these two, the half-moon shape is easier.
For the Half-Moon Momo:
The half-moon momo is very pretty. For this style, you hold the flat circular dough in your left hand and put a tablespoon of filling in the middle of the dough. Then you have to fold your circle of dough in half, covering over the filling. Press together the two edges of the half circle, so it is sealed, with the filling completely encased in the dough.
You will now have the basic half-moon shape, and you can make your momo pretty by pinching and folding along the curved edge of the half circle. Start at one tip of the half-moon, and fold over a very small piece of dough, pinching it down. Continue folding and pinching from the starting point, moving along the edge until you reach the other tip of the half-moon. You can experiment with different folds and pinches to find the way that is easiest and nicest for you.
For the Round Momo:
Place one circle of dough in your left hand, then add a tablespoonful of filling in the centre. With your right hand, begin to pinch the edge of the dough together. You don’t need to pinch much dough in the first pinch – just enough to make a small fold between your thumb and forefinger. Now you will have a little piece of dough pinched together. Continue pinching around the circle little by little, keeping your thumb in place, and moving along the edge of the circle with your forefinger, grabbing the next little piece of dough, and folding and pinching it down into the original fold/pinch being held by your thumb. Basically you will be pinching the whole edge of the circle into one spot.
Continue folding and pinching all around the edge of the circle, then close the hole with a final pinch. Make sure you close the hole on top of the momo. This way, you don’t lose the juicy part of the momo.
As you are making your momos, you will need to have a non-stick surface and a damp cloth or lid handy to keep the momos you’ve made from drying out while you’re finishing the others. You can lay the momos in a lightly greased steamer and cover them with a lid, or lay them on greaseproof paper and cover with a damp cloth.
Steaming the Momos:
Finally, you should boil water in a large steamer. Oil the steamer surface lightly before putting the momos in, so they don’t stick to the metal, then place as many as you can without touching each other. Add the momos after the water boils. Steam the momos for 15 minutes, then serve hot, with soy sauce or hot sauce of your choice to dip them in.
Be careful when you take the first bite of a momo, as the juice is very, very hot and can easily burn your mouth. Enjoy!
Please let me know how your momos turned out…
All recipes on Lay The Table, categorised by cuisine, are archived here.
@ Lay The Table